Moving Off and Stopping
Master the core foundation of every drive: moving away smoothly under complete control using POM (Prepare, Observe, Move) and pulling in safely using MSM (Mirrors, Signal, Manoeuvre). This routine applies to both manual and automatic cars.
Stuck on a term or acronym?
Look up DSSSM, MSPSL, clutch bite and more in plain English in the Jargon Buster.
Knowledge: The Principles of Moving Off and Stopping
Moving off safely requires a balanced routine known as POM: Prepare, Observe, and Move. In a manual car, preparation involves dipping the clutch, selecting 1st gear, setting gas, and finding the biting point. In an automatic car, there is no clutch to manage: you hold the car still on the foot brake with your right foot and take the handbrake off as part of preparing, knowing the car will naturally creep forward once the brake is released. In both cars, observation pairs the interior rear-view mirror first to check following traffic, then sweeps from left to right — left mirror, road ahead, right mirror — finishing with a direct check of the right-hand blind spot over your right shoulder. You are watching particularly for BOB (Boy on a Bike) and TOM (Traffic Overtaking Me). Move involves steering to about 2 o'clock to ease away from the kerb, then straightening to 12 o'clock at a comfortable distance (at least a drain cover's width, roughly 30 cm to 1 metre). As you look forward through the front windscreen, note where the kerb appears to cross your dashboard — this is your driving reference point. You need to know two distinct reference points on the windscreen/dashboard looking ahead: one for your normal driving position, and a second point further to the left for pulling up close to the kerb to stop. Never look into the left-hand mirror to judge kerb distance. When stopping, apply the MSM routine: check interior and left door mirrors, signal if it benefits anyone, steer gently towards the kerb to about 10 o'clock using your close-to-kerb reference point on the front dashboard to finish parallel, brake progressively, secure the car with the parking brake, and select neutral (or Park in an automatic). Your instructor may also ask you to switch the engine off if you will be stopped for a longer chat.
Understanding: Why Observation and Control Matter
A moving vehicle introduces hazard and risk into the road network. Failing to spot a pedal cyclist, motorcyclist, or overtaking car in your blind spot before moving away is one of the leading causes of serious road collisions and practical test failures. Similarly, stopping without prior mirror checks risks being rear-ended by following traffic. By methodically preparing the car beforehand, your hands and mind remain completely free to evaluate surrounding traffic, judge genuine gaps, and react calmly.
Syllabus, Highway Code & Test Requirements
How this lesson aligns with the official national driving standards and practical test assessments in Great Britain.
- Move away safely and under control on the level, on gradients, and at an angle from behind parked vehicles
- Carry out thorough observations: interior mirror first, then sweeping left to right and ending with the right shoulder blind spot
- Use steering clock positions (2, 12, and 10 o'clock) and your two front windscreen/dashboard reference points (looking ahead, never using the left mirror) to maintain safe driving distance and parallel kerb positioning
- Steer using the push-pull method, keeping both hands on the wheel, with the clock face as a guide
- Select a safe, legal, and convenient place to pull over and stop smoothly parallel to the kerb
- Secure the car correctly with the parking brake and neutral upon coming to a rest, switching the engine off if your instructor asks
Highway Code: Waiting and Parking
Do not stop or park near a junction (within 10 metres), near pedestrian crossings, at bus stops, school entrances, or opposite dropped kerbs where access would be obstructed.
Highway Code: Moving Off
Before moving off you must look around, check all mirrors and blind spots, signal if necessary, and ensure you do not cause other road users to slow down or swerve.
Highway Code: Mirror Use
Always check your mirrors well before signalling or changing speed and direction so you have an accurate picture of what is behind and alongside you.
- Assessed throughout the test under 'Move off — safety' and 'Move off — control'
- Assessed multiple times at normal stops and angled stops under 'Normal stop' and 'Precautions'
- A single failure to look over the right shoulder blind spot or pulling out in front of approaching traffic will result in a serious or dangerous fault
Step-by-Step Practical Routine: POM and MSM
Follow these structured routines each time you set off from the kerb and bring the car safely to a standstill. Your instructor will guide you through each motion in your dual-control training car.
In an automatic car, there is no clutch pedal and no biting point to find. Hold the car firmly stationary with the foot brake using your right foot, then release the handbrake. In an automatic, releasing the handbrake is part of preparing the car, leaving the foot brake as the control securing you. Remember that when the foot brake is released, an automatic car will naturally creep forward on its own. Your right foot is the only foot you use for both the foot brake and the accelerator — keep your left foot completely still and out of the way. Removing the handbrake simply prepares the car for the move.
Press the clutch pedal fully to the floor. Select 1st gear. Set a little gas (around 1,500 rpm, a quiet hum) with your right foot. Bring the clutch pedal up slowly until the engine note changes and the rear of the car squats slightly — that is your biting point. Keep your feet completely still.
Mirrors work in pairs. Check your interior rear-view mirror first to confirm nothing is approaching from behind. Then carry out a methodical sweep from left to right: check your left door mirror, scan the road ahead, check your right door mirror, and finish with a direct head-turn over your right shoulder into the right-hand blind spot. As you sweep, watch specifically for BOB (Boy on a Bike) filtering along the kerb or passing, and TOM (Traffic Overtaking Me) pulling out from behind.
BOB and TOM: not sure what they mean?
BOB stands for Boy on a Bike (pedal cyclists, e-scooters, and vulnerable two-wheel road users who may be filtering beside you or approaching swiftly).
TOM stands for Traffic Overtaking Me (motorcycles, cars, and other vehicles already committed to overtaking or moving down the carriageway from behind).
If you are ever unsure how to spot BOB and TOM, or want to check your mirror technique, discuss it with your driving instructor or supervising driver during your next session.
If anyone is approaching who would benefit from knowing your intention — pedestrians waiting to cross, approaching traffic, or cyclists — apply the right indicator. If the road is completely empty, a signal is unnecessary.
Which way does the indicator stalk go?
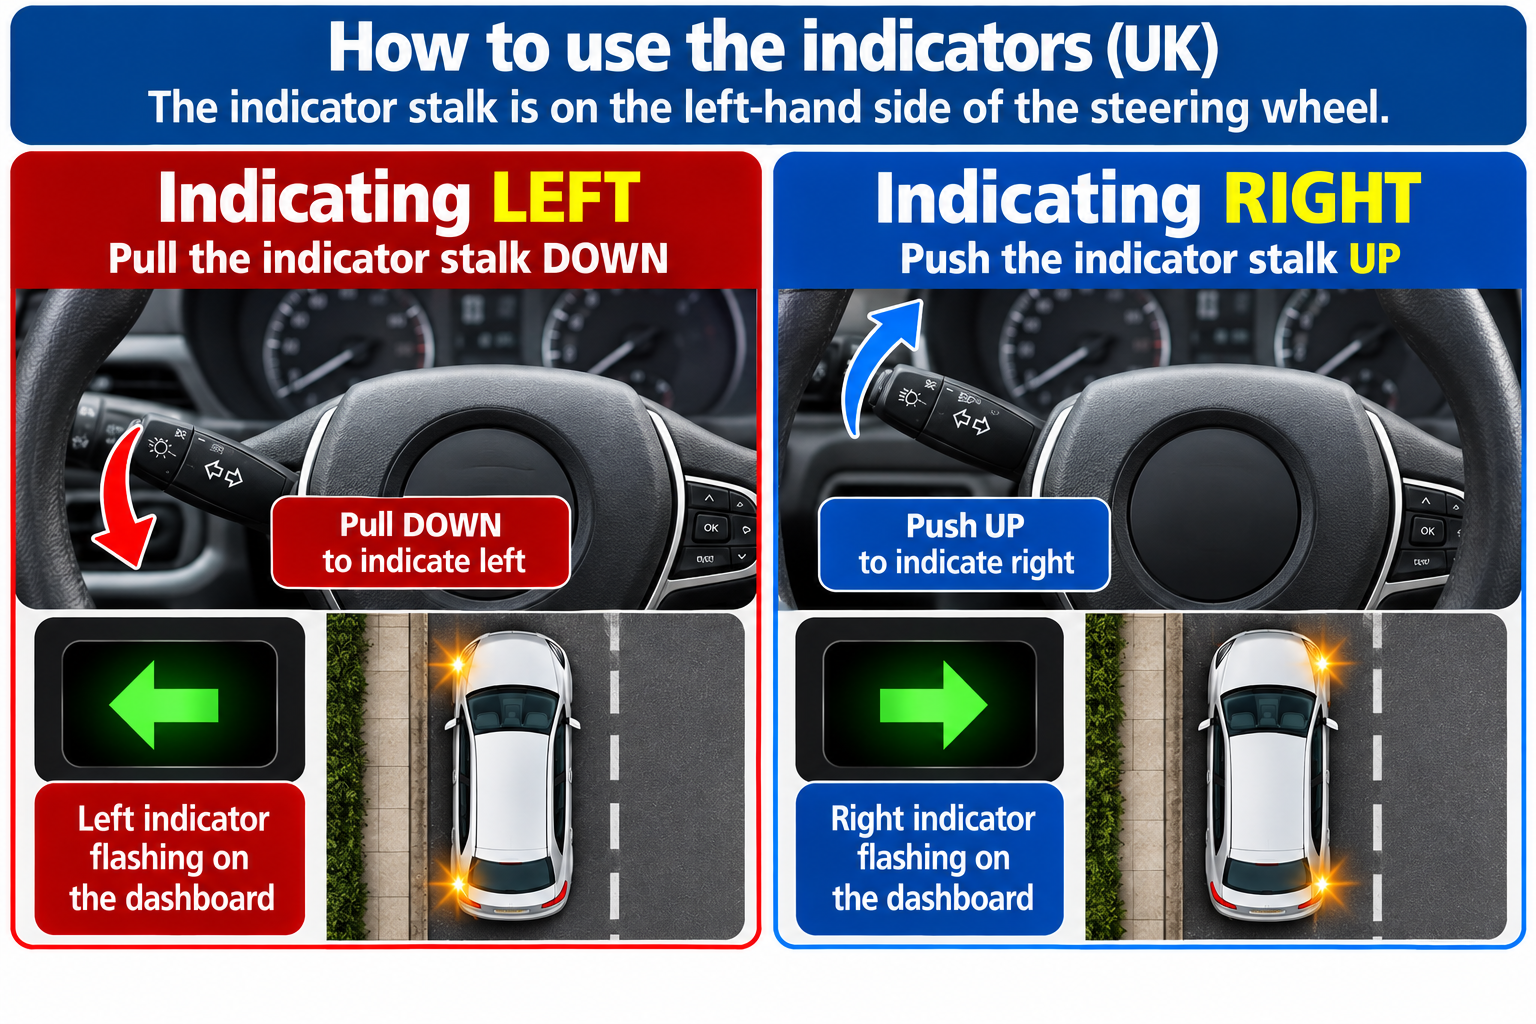
To signal left, pull the indicator stalk downwards. To signal right, push the indicator stalk upwards.
In your first few lessons your driving instructor may say, "Signal up" or "Signal down". They are using KISS: keep it simple. Rather than saying "indicate right", they give you crystal clear directions: signal up means right, signal down means left.
In later lessons your instructor will use the full wording instead, such as "indicate left" and "indicate right", or "signal left" and "signal right".
Give one final check to the right mirror and road ahead. In a manual car, release the handbrake cleanly, ease the clutch up the thickness of a pound coin to let the car roll forward, steer gently into your normal driving position, and once rolling release the clutch completely. In an automatic car, your handbrake is already off: ease your right foot gently off the foot brake, allow the car to creep smoothly forward, and add light pressure on the accelerator as you steer into position.
When parked close behind another car, establish a wider safety margin. Find the bite, look thoroughly, and look past the vehicle ahead. Steer right earlier as you begin to roll, ensuring your front nearside clears the parked car with at least a metre of clearance before straightening up.
As this is the first time you are steering the car on the road, your technique is vital. Turn the wheel using the push-pull method introduced in Lesson 2 on car controls: one hand pushes the wheel upward while the other pulls it downward, keeping both hands in contact with the wheel at all times. Rest your hands comfortably around the ten-to-two or quarter-to-three positions. Never cross your arms over each other or allow the wheel to spin freely through your palms. Visualise the steering wheel as a clock face — we use specific clock positions to describe exactly how much turn is required.
The clock face method
Picture the steering wheel as a clock face. 12 o'clock is the top of the wheel, and it is where the wheel sits when the car is travelling straight ahead.
In this lesson you will use three positions as guidelines: steer gently to about 2 o'clock to move out from the kerb, return to 12 o'clock to go straight, and steer to about 10 o'clock to ease in towards the kerb when stopping.
Use push-pull to get there: pull one hand down and push the other hand up, so both hands stay on the wheel and you keep full control. Small, smooth movements work best.
Ask your driving instructor or supervising driver to show you the push-pull method in the car, and practise it slowly while stationary before you move off.
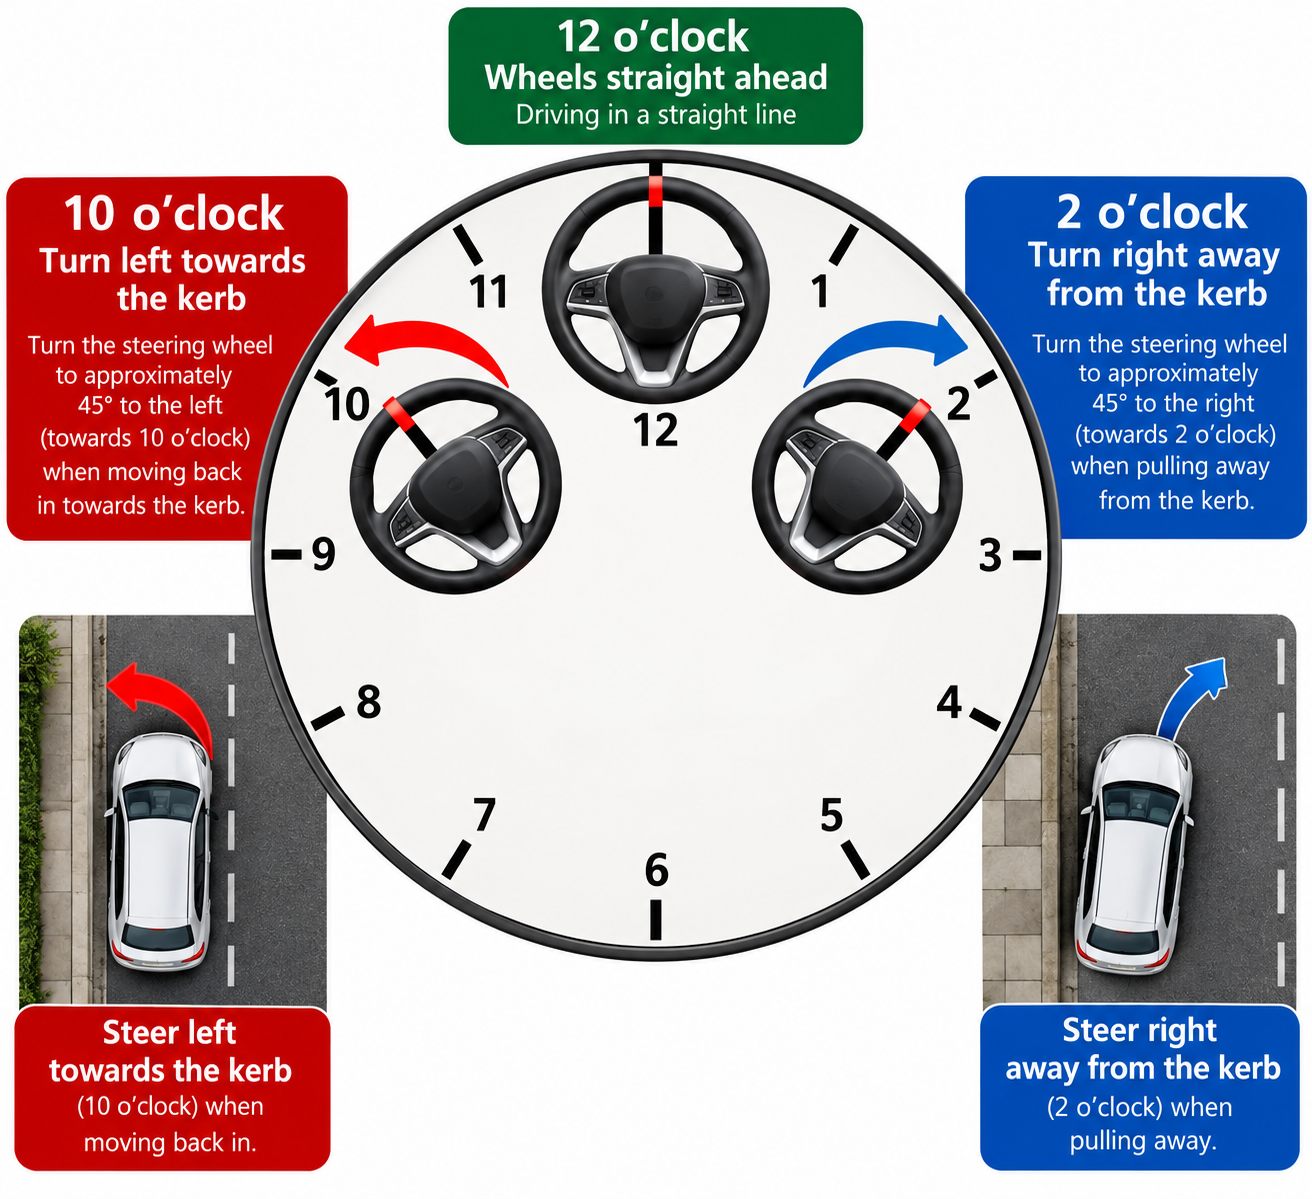
Use the steering wheel clock positions (10, 12, and 2 o'clock) as practical guidelines for turning. Driving on the left, steer gently to about 2 o'clock to move out from the kerb, then steer back to 12 o'clock to head straight ahead down your lane. Once straightened at 12 o'clock, you should be a safe, comfortable distance away from the kerb: at least a drain cover's width, ideally around 30 cm to 1 metre. Your driving instructor or supervising passenger will help you judge what a comfortable distance feels like in your car. Look forward out of the front windscreen and find the spot where the kerb appears to cross your dashboard; that is your reference point (explained below).
Reference points explained
A reference point is a visual marker on the front windscreen or dashboard: the exact spot where the kerb appears to cross as you look straight out of the front of the car.
This marker is completely unique to you. It depends on your height, your seating position, and the shape and size of your car.
You need to know two distinct reference points: one for your normal driving position travelling straight down the road, and a second point further to the left, which you use when pulling up close to the kerb to stop or park.
Always look forward through the front window when checking your road position. Do not use the left-hand door mirror to judge your distance from the kerb, because we want learners looking ahead down the road when travelling in a straight line.
Because reference points depend entirely on your individual sightlines, they are hard to show in a video and can really only be taught inside the car. The underlying principle can be taught online, but the exact points cannot. Ask your driving instructor or supervising driver (parent, family member, or friend) to show you where your two reference points sit in your vehicle.
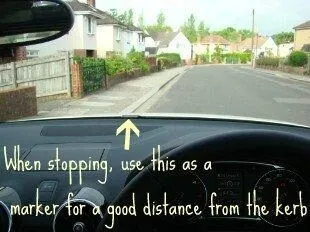
Your instructor will ask you to pull over at a safe, convenient, appropriate, legal place to park — often shortened to SCALP. Check your interior mirror and left door mirror to evaluate following traffic. Signal left if anyone could benefit. Ease off the accelerator and steer gently towards the kerb to about 10 o'clock, applying smooth, progressive pressure on the footbrake as you guide the car inwards, keeping your eyes forward to line up your close-to-kerb reference point on the front windscreen.
SCALP explained
Your instructor will frequently ask you to pull up at a SCALP location. Checking all four elements before you pull over ensures you stop safely and considerately.
Safe means choosing a spot with good visibility where you do not endanger yourself or other road users, well clear of bends, brows of hills, or junctions.
Convenient means convenient for both you and everyone around you, not blocking traffic flow, bus routes, or pedestrian crossings.
Appropriate is the one people miss: it means not stopping somewhere that causes problems for others, such as across someone's driveway. That might not be strictly illegal, but it is not appropriate. Avoid stopping directly opposite another parked car where you would create an awkward pinch point.
Legal means obeying all statutory road markings and signs, such as avoiding double yellow lines, clearways, zig-zag markings near crossings, and parking within 10 metres of a junction.
As the kerb aligns with your stopping reference point on the front windscreen/dashboard (looking straight ahead, never down into the left mirror), steer back to 12 o'clock and make fine adjustments to finish straight and parallel, roughly 20 to 30 cm from the edge. In a manual car, depress the clutch fully about a car length before stopping to avoid stalling. In an automatic car, there is no clutch: simply brake smoothly to a gentle halt with your right foot. The car is now at a complete stop, with your foot on the foot brake (and clutch down in a manual), ready to secure the car in the next step.
Once the car has come to a complete stop, secure it immediately. In a manual car, it is very important that the handbrake goes on firmly and the gear lever is placed into neutral before taking your feet off the pedals. In an automatic car, selecting Park is fine, and you should apply the handbrake as well.
What your instructor might ask you to do
Instructors differ slightly in the exact wording they use when asking you to secure the car. Some will say 'handbrake on and neutral', while others might say 'handbrake off into neutral'. Listen carefully to their exact phrasing and do exactly what they ask.
Your instructor may also ask you to turn the engine off. This is common if they plan to stop for a longer period to stand and talk or discuss your drive, or even during a shorter chat to avoid excess engine noise and exhaust fumes at the roadside.
Listen to your instructor's exact instructions on the day. If you are ever unsure, the safe default is always handbrake on and neutral.
Never leave a manual car sitting in neutral with the handbrake off unless your instructor has explicitly told you to do so and you are on completely level ground with your foot firmly holding the foot brake. Never leave the car with nothing securing it from rolling.
Parked-Car Cockpit Visualisation Drill
Sit in a stationary car with the engine switched off (or visualise in an armchair at home) to build fluid muscle memory for the POM and MSM movement sequence before your next in-car lesson.
Practice Steps
Core Essentials & Examiner Criteria
What you must get right every time, paired with what the driving examiner marks on your practical test.
What You Must Get Right
Check your interior rear-view mirror first, then sweep left to right and finish with your right-hand blind spot over your right shoulder.
Look actively for BOB (Boy on a Bike) and TOM (Traffic Overtaking Me) before committing to move away.
Steer to about 2 o'clock to move away from the kerb, then straighten to 12 o'clock once at a safe distance (at least a drain cover's width, roughly 30 cm to 1 metre).
Identify your two clear reference points on the front windscreen/dashboard looking forward — one for your normal driving position and one further left for stopping — and never rely on the left-hand mirror to judge kerb distance.
When stopping, steer to about 10 o'clock towards the kerb, looking straight ahead through the front windscreen to use your close-to-kerb reference point to finish parallel and 20–30 cm from the edge.
In an automatic car, use your right foot only for the foot brake and accelerator; release the brake slowly because the car creeps forward naturally.
Never force other road users to brake, swerve, or alter their course when moving away from the side of the road.
Select safe, convenient, appropriate, and legal parking locations (SCALP): avoid driveways, dropped kerbs, bus stops, junctions, and double yellow lines.
Always secure the car with the handbrake and select neutral (or Park in an automatic) immediately after coming to a complete stop; your instructor may also ask you to switch the engine off during a long stop or chat.
What the Examiner Looks For
Precise clutch control with no stalling, over-revving, or rolling backwards on gradients
Thorough all-round visual awareness that reacts sensibly to real pedestrians, cyclists, and oncoming vehicles
Effective cancellation of signals after moving away and sensible use of signals when stopping
Reasonable clearance from parked vehicles when moving away at an angle
Accurate positioning roughly 20–30 cm from the kerb, straight and parallel, leaving pedestrian dropped kerbs and driveways clear
Common Mistakes, Test Failures & Safety Tips
Understand how small slips become driving test faults, and how to keep every manoeuvre safe.
Common Learner Mistakes
Rushing the Clutch on Release
Lifting the left foot off the clutch pedal too quickly immediately after the car begins to move, causing the engine to stall or kangaroo down the road.
The 'Mirrors Only' Check
Relying solely on the door and interior mirrors without physically turning the chin to check the blind spot over the right shoulder before moving away.
Signalling Blindly as a Habit
Indicating right automatically every time you start the car, even when no other road user, pedestrian, or cyclist is anywhere near to benefit from it.
Stopping in Front of Driveways or Too Close to Junctions
Pulling in haphazardly across a lowered pedestrian kerb, directly opposite a driveway, or within 10 metres of a road junction without surveying the roadside.
Essential Safety Tips
Look for Vulnerable Road Users First
Pedal cycles, e-scooters, and motorbikes are slim and accelerate fast. A quick glance into mirrors is not enough; your physical head check protects vulnerable road users.
Keep Your Feet Still Until Moving
When releasing the handbrake, resist the impulse to lift the clutch higher. Let the engine torque gently pull the car forward before slowly feeding out the rest of the pedal.
Scan Ahead for Safe Stopping Places Early
Do not wait until the instructor or examiner asks you to pull up. Continually scan the road ahead for long, clear stretches of kerb free of obstructions and paint markings.
Check Mirrors Before Braking, Every Time
Always know what is behind you before your brake lights illuminate. If a large vehicle is tailgating, begin gentle braking earlier to give them ample warning.
Common Causes of Test Failure
How driving examiners categorise errors under the DVSA marking system:
Minor (Driving Faults)
Not potentially dangerous, but marked if repeated.
Hesitation when moving away into a wide clear gap
Remaining stationary at the roadside when several large, safe gaps in traffic have passed, showing a lack of confidence.
Slightly wide or angled finish at the kerb
Stopping safely without obstruction but finishing 40–50 cm away from the kerb or with the front wheels turned noticeably towards the road.
Serious Faults
Potentially dangerous; results in a test failure.
Moving off without checking the right-hand blind spot
Failing to look over the right shoulder before moving away, even if no vehicle was immediately present, representing a serious lack of safety observation.
Causing another vehicle or cyclist to brake or slow down
Pulling out from the kerb into an insufficient gap, forcing an approaching vehicle on the main carriage to decelerate or alter course.
Dangerous Faults
Actual danger to you, examiner, or other road users.
Moving directly into the path of an oncoming or overtaking vehicle
Pulling away while a vehicle or cyclist is actively alongside or overtaking, creating an immediate risk of a sideswipe collision.
Question 1: What does the 'P' in the POM routine stand for when moving off?
Question 2: What is the very last observation you must carry out before releasing the parking brake to move off?
Question 3: When driving on the left in the UK, what clock position guideline should you generally steer towards when easing away from the kerb?
Question 4: According to the Highway Code, where should you avoid stopping or parking during a driving test?
Question 5: When coming to a normal stop at the side of the road, when should you depress the clutch pedal?
Question 6: Should you always indicate right every time you move off from the kerb?
Question 7: In an automatic car, which foot do you use for the foot brake, and what happens when you release it after taking the handbrake off?
Question 8: When your instructor asks you to pull over, what does the acronym SCALP stand for?
Question 9: You have come to a complete stop in a manual car and your instructor wants to chat for a while. What should you do to secure the car?
Theory Test Topics for This Lesson
Reinforce what you have learned by practising official DVSA theory test revision questions.
Revise stopping and waiting restrictions, including clearways, urban clearways, double yellow lines, and school keep clear markings.
Practice on GOV.UKLearn the statutory Highway Code rules regarding parking clearances near junctions, mini-roundabouts, and pedestrian crossings.
Practice on GOV.UKPractice questions focusing on blind spot awareness, mirror routines before braking, and safe overtaking distances for parked cars.
Practice on GOV.UK