Steering and Road Positioning
Master the pull-push steering technique, develop forward vision to maintain a steady course, and position your car safely away from kerbs, parked vehicles, and oncoming traffic.
Stuck on a term or acronym?
Look up DSSSM, MSPSL, clutch bite and more in plain English in the Jargon Buster.
Knowledge: The Principles of Steering & Normal Road Positioning
In the UK, normal road positioning means keeping your car on the left-hand side of your lane, approximately one metre (or a safe, comfortable distance) from the kerb. Maintain a balanced hand grip on the steering wheel at either the 9-and-3 or 10-and-2 position with relaxed wrists and thumbs resting on the wheel rim. To alter direction smoothly, use the pull-push technique (also known as the shuffle technique), which keeps both hands securely in contact with the wheel rim and prevents your arms from crossing over the central airbag. Always scan well ahead rather than fixing your eyes immediately over the bonnet, and remember that any intentional change of road position requires the Mirrors–Signal–Manoeuvre (MSM) routine.
Understanding: Why Visual Targeting & Steady Positioning Prevent Incidents
Your hands naturally guide the car toward where your eyes are focused. If you fixate on the kerb, the white line, or an oncoming vehicle, you will unconsciously steer towards it. By scanning far ahead along your intended path of travel, your peripheral vision naturally monitors your road margins, allowing you to maintain a rock-steady course without jerky corrections. Keeping a safe distance from the kerb protects your wheels and tyres from damage, prevents debris punctures, and leaves essential space for pedestrians on the pavement. Leaving at least a car-door's width when passing stationary vehicles ensures you have time to react if a door opens or a pedestrian steps out between parked cars.
Syllabus, Highway Code & Test Requirements
How this lesson aligns with the official national driving standards and practical test assessments in Great Britain.
- Steer smoothly and accurately in correct relation to the road layout, maintaining control at all speeds
- Position the car correctly on straight roads, bends, and around stationary hazards without wandering
- Apply the Mirrors–Signal–Manoeuvre (MSM) routine before changing your position on the carriageway
- Adjust speed appropriately to the road condition, alignment, and prevailing speed limit
Highway Code: General rules
Keep to the left unless road signs, road markings, or overtaking require you to do otherwise; check mirrors before changing your course.
Highway Code: Using the road
Give vulnerable road users—cyclists, horse riders, and pedestrians—at least as much clearance as you would give a motor vehicle when passing.
Highway Code: Speed limits (rule 124)
Never exceed the maximum legal speed limit; drive at a speed that allows you to stop safely within the distance you can see to be clear.
- Driving test marking sheet item 12: Control — Steering (maintaining steady, controlled steering without crossing arms or losing grip)
- Driving test marking sheet item 13: Positioning — Normal driving (staying safely to the left without hugging the kerb or straddling the centre line)
- Driving test marking sheet item 14: Positioning — Lane discipline (keeping within marked road lanes and selecting appropriate road position for hazards)
Practical Routine: Steering Mechanics and Lane Management
Your driving instructor will guide you through these fundamental physical controls and observational routines in the training car.
Hold the steering wheel rim with both hands lightly but firmly at either the quarter-to-three (9-and-3) or ten-to-two (10-and-2) clock positions. Rest your thumbs on the outer face of the rim rather than hooking them inside, keeping your arms relaxed with bent elbows.
To turn left, slide your left hand up to the top of the wheel to pull downward, while your right hand slides down its side to meet it. Push upward with your right hand as your left hand slides up. Reverse the sequence smoothly to return the wheels to centre.
Project your primary gaze 50 to 100 metres ahead along the centre of your lane or through the curve of a bend. Use peripheral vision to verify your separation from the left kerb and the central dividing line.
Keep the car approximately one metre from the left kerb or the centre of the lane on typical residential and open single carriageways, with a minimum gap of 30 centimetres; avoid drifting into the centre or hugging the gutter. This gap can be reduced, following the popular ADI phrase "less space, less speed" - if we can't leave a metre gap, we need to reduce our speed.
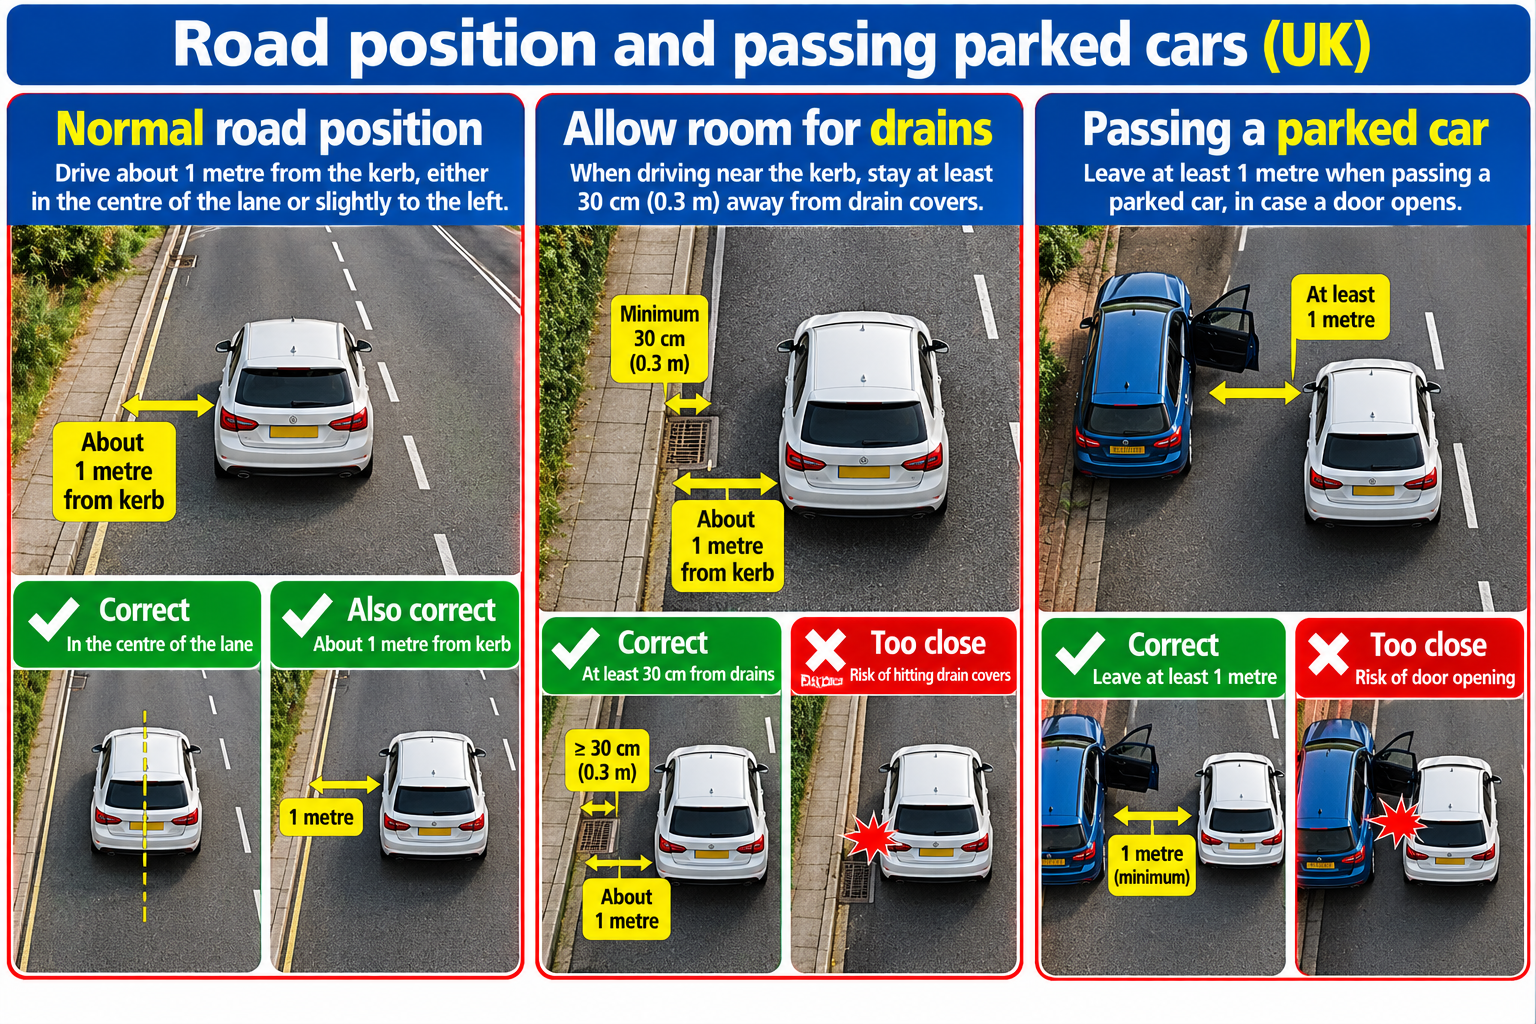
Whenever you need to move out to pass parked vehicles, cyclists, or roadworks, check your interior mirror and appropriate door mirror. Signal if another road user could benefit, and steer smoothly out into your new line well in advance.
Brake in a straight line before entering tight bends or narrow streets. Maintain a steady, appropriate speed through the manoeuvre so that your hands have sufficient time to guide the car accurately.
Parked-Car Steering & Vision Visualisation Drill
A completely safe, stationary exercise you can perform in a parked vehicle with the engine turned off, or sitting on an upright chair holding a plate, to build pull-push muscle memory before your lesson.
Practice Steps
Core Essentials & Examiner Criteria
What you must get right every time, paired with what the driving examiner marks on your practical test.
What You Must Get Right
Keep both hands on the steering wheel except when briefly operating the gear lever or handbrake.
Use the pull-push technique so your hands never cross over the airbag hub or slip off the rim.
Maintain normal driving position about one metre from the left kerb on open, unobstructed roads.
Check interior and exterior mirrors before making any lateral change of position on the road.
Leave at least a full car-door width (approx. 1.2 metres) when passing stationary vehicles.
Look well ahead into your lane rather than staring at the road immediately in front of your bonnet.
What the Examiner Looks For
Smooth, measured steering inputs without abrupt swerving, overcorrection, or crossed-arm lockups.
Consistent road positioning on the left side of the carriageway that adapts sensibly to road width.
Timely observation and mirror checks before moving out around parked cars, cyclists, or obstacles.
Clear lane discipline at roundabouts, multi-lane junctions, and one-way road systems.
Controlled speed on approach to bends, ensuring the vehicle stays entirely within its marked lane.
Common Mistakes, Test Failures & Safety Tips
Understand how small slips become driving test faults, and how to keep every manoeuvre safe.
Common Learner Mistakes
Crossing arms or steering one-handed
Letting one hand drop to your lap or crossing your forearms across the wheel restricts your steering range and risks severe arm injuries if the airbag deploys.
Hugging the kerb or gutters
Positioning the car too close to the left edge increases the risk of clipping the pavement, puncturing a tyre on road debris, or striking pedestrians on narrow footpaths.
Kerb fixation (tunnel vision)
Staring down at the kerb or white lines causes the vehicle to drift toward whatever you look at, leading to continual jerky steering corrections.
Swerving around parked cars without mirror checks
Steering abruptly out to pass an obstacle without first checking the interior and right door mirrors can endanger overtaking motorists or cyclists.
Essential Safety Tips
Never let the wheel slide uncontrolled
Never release the steering wheel completely to let it spin back on its own after a turn; feed it back through your hands in a controlled manner.
Anticipate doors and pedestrians around parked cars
Watch for telltale signs of movement around stationary cars: exhaust fumes, glowing brake lights, front wheels turning out, or children playing nearby.
Slow down before sharp or blind bends
Adjust your road speed before the turn so you can maintain a safe road position on your own side of the white line without running wide.
Give generous clearance to cyclists and horse riders
Wait patiently behind vulnerable road users until you have clear road ahead, then pass with at least 1.5 metres clearance at speeds under 30 mph.
Common Causes of Test Failure
How driving examiners categorise errors under the DVSA marking system:
Minor (Driving Faults)
Not potentially dangerous, but marked if repeated.
Occasional minor steering overcorrection
Turning the steering wheel slightly too far on a gentle curve and making a minor corrective adjustment that causes no danger or inconvenience.
Inconsistent clearance when passing an obstruction
Passing a stationary vehicle slightly closer than ideal when the road ahead is completely clear and oncoming traffic is absent.
Serious Faults
Potentially dangerous; results in a test failure.
Mounting or heavily striking the kerb
Allowing the vehicle's wheels to mount the pavement or strike the kerb violently, showing a loss of vehicular control and endangering pedestrians.
Crossing the centre white line into opposing traffic
Cutting across the central dividing line on a right-hand bend or failing to position safely on the left, forcing opposing vehicles to slow down or alter course.
Dangerous Faults
Actual danger to you, examiner, or other road users.
Passing stationary hazards into the path of oncoming vehicles
Pulling out to pass parked cars when an approaching vehicle is already committed, forcing the oncoming driver or your examiner to brake harshly to avoid a head-on collision.
Question 1: What is the recommended hand position on the steering wheel during normal driving?
Question 2: Why should you avoid crossing your arms across the steering wheel boss?
Question 3: What is the normal road position on an unobstructed UK two-way road?
Question 4: How much clearance should you aim to leave when passing parked vehicles?
Question 5: What routine must you carry out before altering your position to pass an obstruction?
Theory Test Topics for This Lesson
Reinforce what you have learned by practising official DVSA theory test revision questions.
Study signs showing road narrows on one side, minimum and maximum speed limits, and priority over oncoming vehicles.
Practice on GOV.UKUnderstand lane selection arrows, road markings indicating lanes for turning left or right, and priority on narrow roads.
Practice on GOV.UKPractise questions about maintaining vehicle control, stopping distances in adverse weather, and clearance for vulnerable road users.
Practice on GOV.UK