Mirrors
Master the correct setup, glass characteristics, and systematic routines for all three vehicle mirrors. Looking in your mirrors is all about taking vital information from the road around you before making any change to your speed or course.
Stuck on a term or acronym?
Look up DSSSM, MSPSL, clutch bite and more in plain English in the Jargon Buster.
Mirror Glass Types, Viewing Angles, and the TUG Information Process
A modern car is equipped with three separate mirrors designed to give you a composite view behind and to the sides of your vehicle. The interior rear-view mirror uses flat glass, which shows objects at their true optical size and true distance, allowing you to gauge following gaps accurately. In contrast, door mirrors typically employ convex glass (curving slightly outwards) which creates a wider field of view to capture approaching vehicles sooner, though objects appear smaller and therefore farther away than they actually are. Driver-side door mirrors often feature an aspheric glass design, where a flat inner surface meets a distinctly curved outer edge separated by a faint dashed vertical line, drastically reducing the vehicle's side blind spot. Concave glass (which curves inwards) is never used for car mirrors because it magnifies images and severely narrows the viewing angle. Crucially, looking into your mirrors is the cornerstone of the Take step in the advanced driving TUG process (Take, Use, Give): you Take essential road data through continuous, systematic observation; you Use that information to plan your speed and positioning; and you Give signals or warnings to other road users only when it will genuinely benefit them.
Why We Use Mirrors in Pairs and Guard Against Vulnerable Road Users
No single mirror ever provides a complete picture of what is happening around your vehicle. This is why mirrors must always be checked in complementary pairs: the interior mirror gives you the immediate true-scale situation behind your rear bumper, while the corresponding exterior door mirror checks the specific lane or kerbside flank into which you plan to steer or signal. Whenever you check your mirrors, your mind must actively scan for two primary road hazards: BOB (Boy on a Bike, the vulnerable cyclist or motorcyclist who is narrow, agile, and easily obscured by window pillars) and 'TOM' (Traffic Overtaking Me, referring to vehicles accelerating past in your blind zone or adjacent lane). Furthermore, mirrors only reveal what has already entered their optical line of sight; they can never eliminate the blind-spot pocket over your shoulders. Safe drivers always verify their mirrors before signalling or braking, and support every mirror routine with an over-the-shoulder physical blind-spot check before moving away from rest or changing lanes.
Understanding how flat, convex, and aspheric glass affect distance and field of view
No optical distortion. Accurate for judging following distance and closing speed directly behind.
Objects appear smaller and farther away. Captures a wider field of view to spot vehicles earlier.
Flat centre with a sharply curved outer strip (marked by a dashed line) to minimize the blind spot.
- BOB“Boy on a Bike” (BOB): Motorcyclists and pedal cyclists seen in the left and right mirror checks. Their narrow visual profile is easily hidden behind window pillars or door frames. Always look twice.
- TOM“Traffic Overtaking Me”: Vehicles approaching at higher speed in adjacent lanes, ready to overtake as you prepare to signal or change course.
- • Mirrors in pairs: Check the interior mirror first to establish true following distance, then immediately check the exterior mirror on the side you plan to move towards. One mirror alone never provides the full picture.
- • TUG principle (Take, Use, Give): Looking in mirrors is how you Take information. You then Use it to plan your speed and positioning, and Give signals only when it genuinely benefits others.
Syllabus, Highway Code & Test Requirements
How this lesson aligns with the official national driving standards and practical test assessments in Great Britain.
- Carry out effective, systematic mirror observations before signalling, altering speed, or changing direction.
- Understand the characteristics and optical distortion differences between flat, convex, and aspheric mirror glass.
- Identify vulnerable road users (cyclists and motorcyclists) and overtaking traffic in door mirrors and physical blind spots.
- Maintain stable seating and steering posture without stretching or leaning when checking mirrors.
Highway Code: Rules about driving — Before you set off (mirrors and vision)
Before starting off, you should ensure that your mirrors are clean and properly adjusted so that you have clear visibility all round your vehicle from your normal driving posture.
Highway Code: Signals and manoeuvring — Using mirrors before acting
You must always check your mirrors in good time before signalling, changing course, turning into side roads, overtaking, or altering your road speed.
Highway Code: Vulnerable road users — Motorcyclists and cyclists
Always look out for cyclists, motorcyclists, and other vulnerable road users who may be filtering through traffic or overtaking you on either side.
- Use of mirrors: The driving examiner marks faults under 'Use of mirrors — Signalling, Change direction, Change speed' if checks are omitted or performed late.
- Show Me, Tell Me vehicle safety checks: You may be asked questions relating to keeping mirrors clean, clear glass, and operating windscreen demisters.
- DVSA Theory Test Bank: Questions on alertness, hazard awareness, and vehicle handling frequently test mirror routines, blind-spot checks, and glass types.
Step-by-Step Mirror Setting and Systematic Observation Routine
Adjusting your mirrors must always be completed while stationary before the vehicle moves. Follow this professional routine to configure your optical lines and execute effective mirror checks on every drive.
Never adjust mirrors before setting your seat. Complete the DSSSM cockpit drill: adjust seat base, backrest rake, head restraint, and steering wheel so you sit in your natural driving posture without leaning forward.
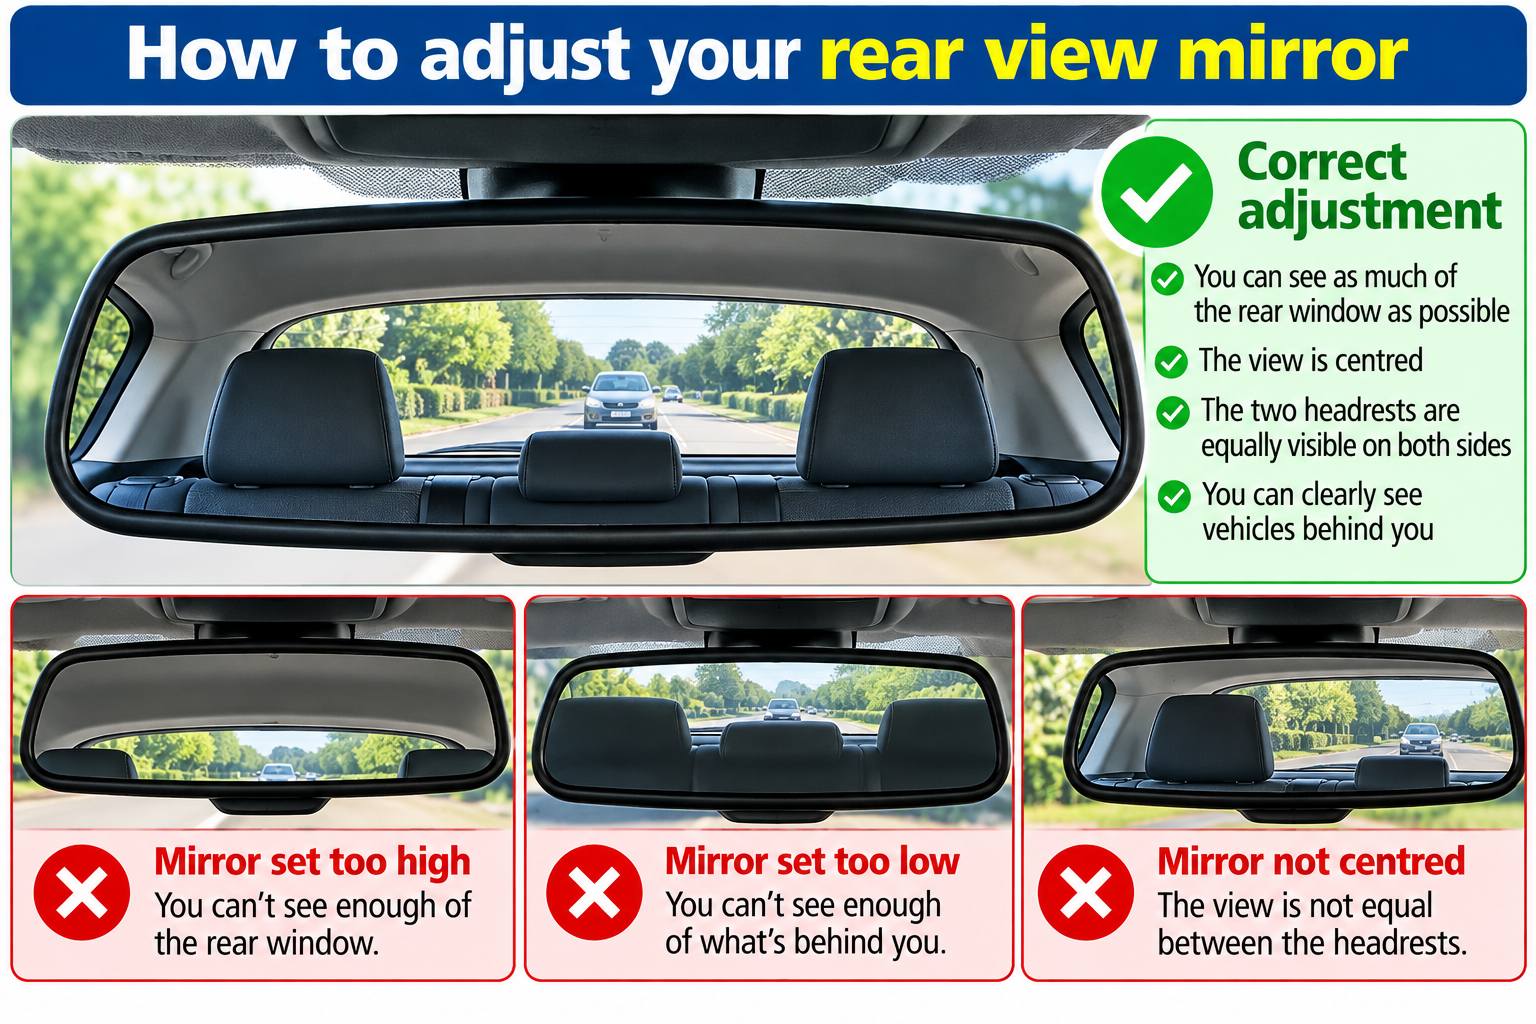
Hold the interior flat-glass mirror by its plastic rim with your left hand to avoid smudging the glass. Adjust it until the entire rear windscreen is neatly centred in the frame, keeping your head in its normal relaxed driving position.
Using the electric adjustment control or manual toggle, align the driver's exterior mirror so the road horizon sits level across the middle. Ensure just a thin sliver (about 5%) of your car's rear bodywork remains visible in the inner edge for spatial reference.
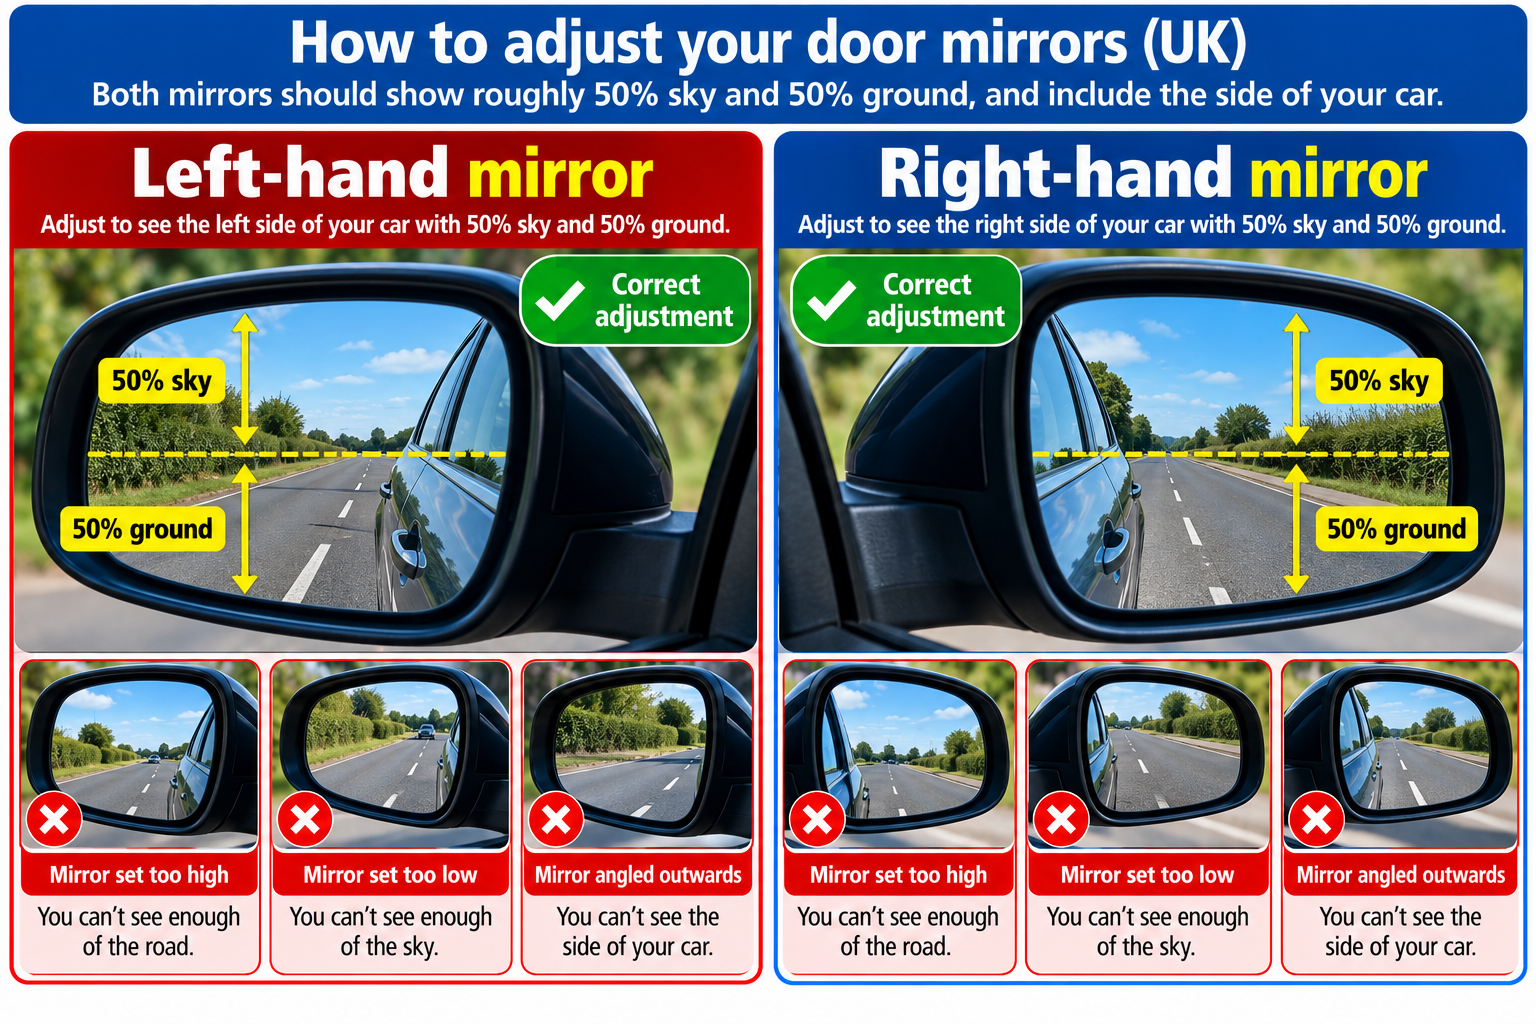
Adjust the passenger-side convex mirror similarly, keeping the horizon in the centre and a sliver of the vehicle side visible. This gives maximum coverage of the nearside kerb and cycle lanes without excessive sky or tarmac.
Before any manoeuvre or signal, check mirrors in pairs: first the interior mirror to assess true following distance, followed immediately by the exterior mirror in the direction you plan to move, scanning actively for BOB (Boy on a Bike) and TOM.
Glance quickly over your shoulder into the blind spot area beside your door pillars before pulling away from the kerb or executing a lane change, ensuring no pedestrian, cyclist, or filtering bike has slipped past your mirrors.
A structured teaching routine for a continuous glance all around the car before moving off. It is not compulsory, and the DVSA does not mandate a rigid six-point sequence—only effective observation including blind spots. However, it is routinely taught by major national driving schools and is part of common instructor jargon, making it handy to know.
The Six-Point Check
Some instructors feel checking the left-hand blind spot when pulling away is overkill and unnecessary, and some will not teach this method. But the major national driving schools use it, so it is useful to understand. Our view is that it is worth learning.
The six points are commonly taught in this order for a right-hand-drive UK car:
1. Left blind spot: look over your left shoulder for anything alongside the car.
2. Left door mirror: check for approaching traffic, particularly cyclists.
3. Interior mirror: check traffic approaching from behind.
4. Right door mirror: check traffic approaching on the driver's side.
5. Right blind spot: look over your right shoulder for vehicles, cyclists or other hazards.
6. Ahead: make a final check that the road ahead is clear before moving.
Some instructors vary the order (for example starting with the view ahead, or finishing with the right blind spot). What matters is effective observation, not one rigid order.
Where it helps: when parked or stationary, moving away from the hold back position, during manoeuvres, turning in the road, and especially when reversing and finishing manoeuvres. It is a good habit to take a continuous glance all around the car before moving off.
If a cyclist or other road user appears halfway through the checks, stop and reassess rather than finishing the sequence blindly. When pulling away from the left-hand kerb, the final right-hand blind-spot check is particularly important because passing traffic approaches from that side.
The six-point check: a continuous glance around the car before moving off
Stationary Mirror Alignment and Spatial Tracking Drill
Practice your stationary mirror calibration and observe objects passing your car to build intuition for how flat and convex glass render distances.
Practice Steps
Core Essentials & Examiner Criteria
What you must get right every time, paired with what the driving examiner marks on your practical test.
What You Must Get Right
Always set your driving seat and steering posture completely before adjusting any of your three mirrors.
Never attempt to adjust or tweak mirrors while driving; if your view is inadequate, find a safe, legal place to stop.
Remember that convex door mirrors make approaching vehicles appear smaller and further away than they truly are.
Check your mirrors in pairs: interior mirror first for true distance, then the exterior mirror for the direction you plan to steer.
Always look specifically for BOB (Boy on a Bike — cyclists/motorcyclists) and 'TOM' (Traffic Overtaking Me) before signalling or changing speed.
A mirror check is never complete without an over-the-shoulder blind-spot check before moving off or changing lanes.
The six-point check (left blind spot, left mirror, interior mirror, right mirror, right blind spot, ahead) is optional, but it is a handy routine before moving off.
What the Examiner Looks For
Checking the interior mirror well in advance before braking or easing off the accelerator.
Checking mirrors in correct pairs before indicating any change of direction.
Taking effective, timely action based on what is seen in the mirrors rather than just glancing mechanically.
Conducting essential blind-spot shoulder checks before pulling out into the road stream.
Remaining calm with hands steady on the steering wheel, without stretching or leaning forward to peer into mirrors.
Common Mistakes, Test Failures & Safety Tips
Understand how small slips become driving test faults, and how to keep every manoeuvre safe.
Common Learner Mistakes
Adjusting mirrors while moving along the road
Reaching over to adjust a door or interior mirror while in motion diverts your hands and attention from steering, introducing immediate hazard risks.
Glancing mechanically without processing information
Flicking eyes toward the glass out of habit without actually 'taking' the information (failing the TUG principle) or reacting to approaching traffic.
Signalling before checking mirrors
Flicking the indicator stalk before checking the interior and door mirror, which misleads following drivers before confirming the manoeuvre is safe.
Relying purely on mirrors with no blind-spot checks
Trusting mirrors entirely when pulling away from the kerb, failing to spot cyclists or pedestrians standing alongside the car's blind spots.
Essential Safety Tips
Practice the TUG advanced observation mindset
Remember TUG: Take information systematically through your mirrors, Use it to anticipate what others will do, and Give signals only when beneficial.
Keep mirror glass clean and demisted before driving
Clean road salt, dust, and rain spots off all mirrors before departure, and switch on the heated door mirror demister in damp or frosty conditions.
Pull over safely if your mirror view is compromised
If your seat shifts or you find yourself stretching to see behind, do not fumble with the controls on the move; find a safe place to stop and readjust.
Look twice for narrow road users: BOB (Boy on a Bike)
Because cyclists and motorcyclists have a narrow profile, consciously scan your door mirror edges and blind spots for single headlights or cycling apparel.
Common Causes of Test Failure
How driving examiners categorise errors under the DVSA marking system:
Minor (Driving Faults)
Not potentially dangerous, but marked if repeated.
Late mirror check before gentle braking
Applying the footbrake moments before checking the interior mirror on a clear, straight road with no immediate danger behind.
Briefly forgetting the nearside mirror on left turn
Checking only the interior mirror when approaching a left turn, omitting the door mirror check for cyclists on an open road.
Serious Faults
Potentially dangerous; results in a test failure.
Attempting to adjust mirrors while driving
Taking a hand off the steering wheel and eyes away from oncoming hazards to tilt a misaligned door mirror while the car is moving.
Failing to check mirrors before changing lane or turning
Signalling and commencing a turn into a side road or dual carriageway lane without checking the exterior mirror for overtaking traffic.
Dangerous Faults
Actual danger to you, examiner, or other road users.
Pulling out into the path of an overtaking vehicle or cyclist
Steering out from the kerb or changing lanes directly in front of 'TOM' (Traffic Overtaking Me) or a filtering motorcyclist, forcing them to brake hard.
Swerving across lane markings while leaning to peer into a mirror
Leaning across the car to see through a poorly adjusted passenger mirror, causing the car to drift dangerously across the road centre line.
Question 1: Why is convex glass used on car door mirrors instead of flat or concave glass?
Question 2: Why must mirrors always be checked in pairs rather than relying on a single mirror?
Question 3: What do 'BOB' (Boy on a Bike) and 'TOM' remind a driver to look for in their mirrors?
Question 4: In the advanced driving acronym TUG, which element do your mirror checks fulfill?
Question 5: What must you do if you notice while driving that your door mirror is poorly positioned and you have to stretch to see?
Theory Test Topics for This Lesson
Reinforce what you have learned by practising official DVSA theory test revision questions.
Study how regulatory signs, lane discipline boards, and minimum speed limits dictate when you must check mirrors and adjust your road position.
Practice on GOV.UKRevise mirror-signal-manoeuvre routines at complex roundabouts and multi-lane junctions to protect filtering motorcyclists and cyclists.
Practice on GOV.UKPractice DVSA theory questions regarding alertness, blind-spot awareness, and safe overtaking distances for vulnerable road users.
Practice on GOV.UK