Turning Right into Side Roads
Learn the systematic MSPSL routine for turning right from a major road into a minor side road, including correct road positioning, gap selection across oncoming traffic, and giving way to crossing pedestrians.
Stuck on a term or acronym?
Look up DSSSM, MSPSL, clutch bite and more in plain English in the Jargon Buster.
The Rules and Geometry of Turning Right Across Traffic
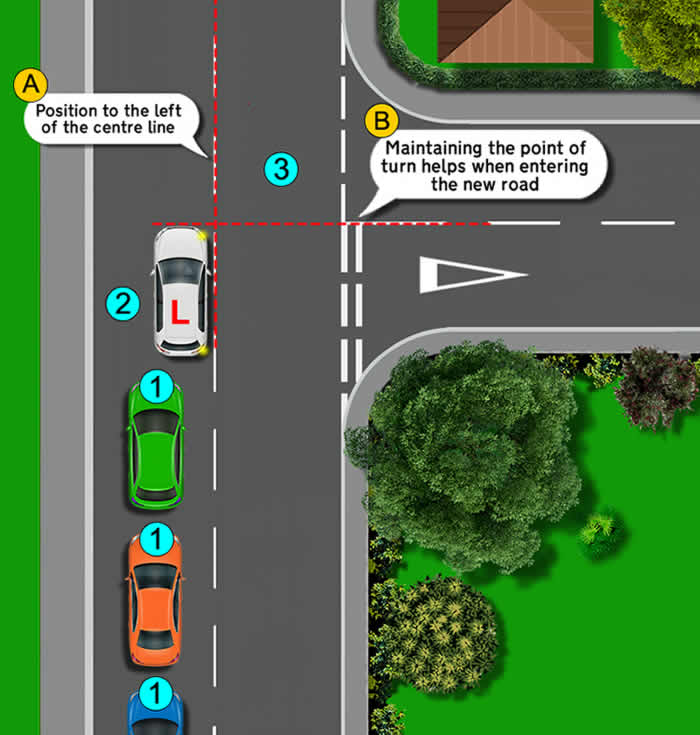
Turning right requires you to cross the oncoming lane of traffic. Under the UK Highway Code and DVSA standards, you must use the MSPSL routine (Mirrors, Signal, Position, Speed, Look). Position your vehicle just to the left of the centre hazard line (or in any dedicated right-turn filter lane/bay), keeping your wheels pointing straight ahead while waiting. You must give priority to all oncoming vehicles, cyclists, and motorcyclists before committing. Under Highway Code Rule 170 and the updated hierarchy of road users, you must also yield to pedestrians who are crossing or waiting to cross the side road into which you are turning.
Why Position, Timing, and Straight Wheels Protect You
Positioning just left of the centre line communicates your intended path early and leaves enough room on your left for following vehicles to proceed safely without undertaking on the pavement. Keeping your steering wheels straight while waiting to turn is a critical life-saving discipline: if your wheels are angled right and another vehicle strikes your car from behind, your vehicle would be pushed directly into oncoming head-on traffic. Waiting with straight wheels ensures any shunt drives you straight forward within your own lane.
How to Spot a Junction Before You Turn
You can only turn right safely if you notice the side road early. Before you start the MSPSL routine, look well ahead and use these five clues to work out that a junction is coming up.
1. Road signs
Look for a red-bordered triangular warning sign. A picture of a main road with a smaller road joining it tells you there is a side road ahead. The sign usually appears before the junction, giving you time to prepare.

2. Gaps in buildings
Look at the houses, walls, hedges and fences beside the road. A gap in a long row of buildings or boundaries often means a side road, a driveway or an access road.
- Look for a break in the line of houses or shops
- Look for a gap in hedges, walls or fences
- Look for a lamp post or tree set back from the usual line
3. Road markings
The road surface gives clues too. Scan the road ahead for markings that show a junction.
- Hazard warning lines: the white centre line changes to longer dashes with shorter gaps as a junction or other hazard gets closer
- Give Way markings (a broken line across the road) on the side road, which you can sometimes see as you approach
- Double yellow lines around the mouth of a junction, which keep the corner clear of parked cars
- A white arrow or a marked right-turn lane or box in the middle of the road
4. Cars entering and leaving
Watch what other drivers are doing. Vehicles ahead that slow down, signal, or turn into or out of a road you had not noticed are a strong clue that a junction is there.
- Look for brake lights or indicators on vehicles ahead
- Look for cars waiting to emerge from a road on either side
- Look for vehicles appearing from between buildings
5. Open or closed junction?
As soon as you spot the junction, decide whether it is open or closed. This is about how much you can see into the side road and along the road it joins, and it sets your approach speed.
An open junction gives you a wide, clear view early, before you reach the junction. A closed junction has a blocked view: remember BBBV, which is Buildings, Bushes, Bricks (walls) and Vehicles (such as parked cars and vans).
- Open: you can see well into the side road, so approach at a controlled pace and be ready to stop at the centre line if oncoming traffic or pedestrians are there
- Closed: your view is blocked, so slow down much earlier, select a low gear (first if it is blind or tight) and be ready to stop
- Open describes what you can see, not how busy the road is
Once you have spotted the junction and decided whether it is open or closed, start the MSPSL routine for turning right: Mirrors, Signal, Position, Speed, Look.
Syllabus, Highway Code & Test Requirements
How this lesson aligns with the official national driving standards and practical test assessments in Great Britain.
- Carry out the MSPSL routine systematically on approach to every right turn.
- Position accurately just left of the centre line without encroaching onto the opposing lane.
- Assess oncoming vehicle speeds, identify safe gaps, and hold a safe waiting position when required.
- Observe pedestrians, cyclists, and motorcyclists in accordance with the Highway Code hierarchy.
Highway Code: Junctions (rule 170)
Rule 170 covers giving way to pedestrians crossing junctions and turning right across oncoming traffic without cutting corners.
Highway Code: Hierarchy of Road Users (Rule H2)
At junctions, drivers must give way to pedestrians crossing or waiting to cross a road into which the driver is turning.
Highway Code: Overtaking & Cyclists
Always check mirrors and blind spots for motorcyclists or cyclists filtering or overtaking along your right flank.
- Driving test assessment under 'Junctions – Turning right', evaluating observation, approach speed, and road positioning.
- Driving test assessment under 'Use of mirrors – Signalling / Change of direction' before altering course or slowing down.
- Driving test assessment under 'Control – Steering' to verify you do not cut the corner or clip kerbs upon entering.
MSPSL Practical Routine for Turning Right
Apply the Mirrors, Signal, Position, Speed, and Look routine with calm precision as soon as you identify the right turn.
Check your interior rear-view mirror first to assess traffic following behind, followed immediately by your right door mirror. Verify whether any vehicle or motorcyclist is attempting to overtake you on the offside.
Apply your right indicator in good time—neither too early to mislead road users into thinking you are pulling into an earlier driveway, nor too late so following vehicles are caught unprepared by your braking.
Guide your vehicle smoothly towards the centre line, stopping just left of the dividing line or marked right-turn reservoir box. Do not straddle or clip the white line, and ensure your front wheels remain pointing straight ahead.
Brake progressively down to roughly 10–15 mph. Select second gear for an active turn if the road is clear, or first gear if you must come to a complete stop at the point of turn to give way.
Look ahead into the oncoming lane and deep into the side road mouth. Assess oncoming vehicle speed and distance. Before turning across the oncoming lane, perform a quick glance into your right-hand blind spot to confirm no overtaking cyclist or vehicle has slipped alongside you. (LADA stands for Look, Assess, Decide, Act. It is the final part of the MSPSL routine: Mirrors, Signal, Position, Speed, Look.)
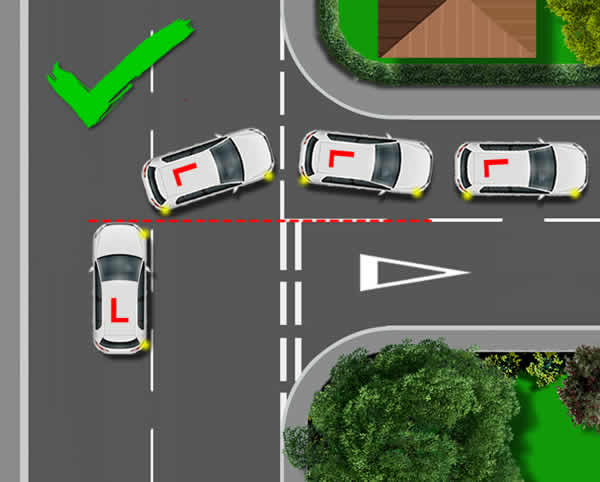
Once a safe gap appears and crossing pedestrians have cleared, drive forward to the point of turn (level with the centre line of the side road) before steering smoothly. Never cut the corner across the wrong side of the side road.
Why Cutting the Corner Fails Tests
This short video gives a clear example of why cutting the corner at a junction can lead to failing a driving test.
Cutting the corner is one of the most common reasons driving tests are failed.
It is easily avoided by picturing an imaginary cone in the middle of the junction and always steering around it into the correct side of the road, keeping to the correct centre line.
Video: an example of cutting the corner at a junction and why it can fail your driving test
As you move into the new road, check the signs for the appropriate speed. Has the speed limit changed? Has the road changed? Then ask the question many ADIs ask: do a mirror check and say "New road, new mirrors." It is a phrase commonly taught by ADI driving instructors. Only accelerate up to the limit once the checks are complete and the road ahead is clear.
Parked-Car Routine and Visualisation Drill
With the engine off and handbrake firmly applied in a safe parked location, practise the cockpit physical sequence and mental scan for a right turn.
Practice Steps
Core Essentials & Examiner Criteria
What you must get right every time, paired with what the driving examiner marks on your practical test.
What You Must Get Right
Always check your interior mirror and right door mirror before signalling or braking.
Position your car just to the left of the white centre line, parallel to the road.
Keep your front wheels pointed dead straight while waiting for oncoming traffic to pass.
Give way to all oncoming traffic, including approaching pedal cycles and motorbikes.
Give way to pedestrians crossing or waiting to cross the entrance of the side road.
Steer around the centre point of the junction mouth—never cut the corner.
Spot the side road early using signs, gaps in buildings, road markings and traffic movements, then decide whether the junction is open or closed, because that sets your approach speed, before you start MSPSL.
New road, new mirrors: after the turn, check the signs for the speed limit, ask whether the speed or the road has changed, and do a mirror check before you accelerate.
What the Examiner Looks For
Timely and well-judged use of the right indicator that gives clear notice without confusing earlier road users.
Accurate lateral positioning that leaves adequate passing clearance on your left without drifting over the centre line.
Safe, patient gap selection that does not force oncoming drivers to brake, swerve, or alter speed.
Clear observation of vulnerable road users, checking right-side blind spots and yielding to crossing pedestrians.
Correct steering into the new road, entering cleanly on the left-hand side without mounting or striking the kerb.
Common Mistakes, Test Failures & Safety Tips
Understand how small slips become driving test faults, and how to keep every manoeuvre safe.
Common Learner Mistakes
Pre-turning the wheels while waiting
Angling the front wheels to the right while waiting for a gap exposes you to being shunted directly into oncoming traffic if hit from behind.
Cutting the corner into the side road
Turning early across the wrong side of the side road mouth puts you on a direct collision course with emerging vehicles.
Forgetting the right shoulder blind spot check
Failing to check the offside blind spot before steering right risks hitting an overtaking motorcycle, cyclist, or car that ignored your signal.
Misjudging oncoming vehicle speed
Turning right across the path of oncoming traffic and forcing an approaching driver to slow down or swerve.
Essential Safety Tips
Watch for hidden motorcycles behind oncoming vans
Large vehicles approaching in the opposite direction can conceal oncoming motorbikes or cyclists; ensure your view is completely clear before crossing.
Look deep into the side road before committing
Ensure there is a clear space in the side road to complete your entry; parked delivery vans or roadworks could block you across the oncoming lane.
Beware of vehicles overtaking you on your right
Impatient drivers behind may try to overtake on your offside if they miss your signal or think you are stopping at the kerb; always re-check your right mirror.
Maintain straight wheels until you move
Only turn the steering wheel once you have identified your gap and released the footbrake to propel the car forward.
Common Causes of Test Failure
How driving examiners categorise errors under the DVSA marking system:
Minor (Driving Faults)
Not potentially dangerous, but marked if repeated.
Late right-turn signal
Signalling right only after beginning to brake, giving following traffic delayed notice of your intention.
Imperfect junction entry position
Entering the side road slightly wide towards the centre before promptly correcting into the normal driving line.
Serious Faults
Potentially dangerous; results in a test failure.
Cutting the corner across oncoming lane
Steering across the give-way line or wrong lane of the side road where an emerging vehicle was approaching or waiting.
Failing to give way to oncoming traffic
Turning right across the path of oncoming traffic, forcing an oncoming car or motorcycle to brake or alter their course.
Dangerous Faults
Actual danger to you, examiner, or other road users.
Turning into an occupied pedestrian crossing path
Accelerating into the side road while pedestrians are crossing the carriageway, causing imminent risk of collision.
Turning right across high-speed oncoming traffic
Committing to the right turn directly in front of close oncoming traffic, requiring the examiner to intervene on dual controls.
Question 1: Why must your steering wheels point straight ahead while waiting in the centre of the road to turn right?
Question 2: Where should you position your vehicle on approach to a right turn on an unmarked two-way road?
Question 3: Under Highway Code Rule 170 and the hierarchy of road users, what must you do if a pedestrian has started crossing the side road you want to turn into?
Question 4: What is the danger of 'cutting the corner' when turning right into a side road?
Question 5: What critical safety check should you make just before turning your steering wheel across the opposing carriageway?
Theory Test Topics for This Lesson
Reinforce what you have learned by practising official DVSA theory test revision questions.
Look out for advance warning signs showing side roads on the right, priority over oncoming vehicles signs, and mini-roundabout junction signs.
Practice on GOV.UKStudy give way rules when turning right across oncoming traffic and the Highway Code hierarchy of road users regarding pedestrians crossing side roads.
Practice on GOV.UKPractise official theory questions regarding gap selection, overtaking hazards on the offside, and positioning near centre lines.
Practice on GOV.UK